If you're new to programming computers or have never written a generative art piece before, you are the audience for this post! In it we'll explore a classic and simple alogorithm in generative art called "Circle Packing".
Prerequisites:
- Some familiarity with Python
- Read about classes.
- Read about static methods.
- An interest in generative art


Some images generated using the methods described in this article.
Before we start I'd like to cover some background on generative art generally. When working on generative art, we work on a system that generates the art rather than the art itself. If you are coming from a manual medium such as painting the first thing you're likely to notice is how mutable it is as a medium.
It's orders easier to completely change the output of a generative system than to pull out a new canvas and start a painting from scratch every time a new idea occurs to you. It naturally lends itself to exploring, and it is totally ok to sit down to work without knowing exactly what you're going for because you can find it along the way.
Over time generative artists tend to pursue systems that surprise them. Many consider the "Holy Grail" of generative art to be a system that consistently generates surprising, diverse, and interesting output.
Not all generative artists write programs! Ella Gibbins creates a beautiful generative scenes by configuring liquids to interact and filming them. Linden Gledhill sets up chemical mixtures that can be influenced by magnets and photographs them. The history of generative art is rich and far older than programmable computers.
However in this guide we will we write code.
We'll work in Processing, because the body of beginner documents for it is prolific, and we'll use it in Python mode because that seems to be one of the languages people inevitably learn no matter their background or opinion on it.
Setup
To follow along,
- Download Processing.
- Enable python mode.
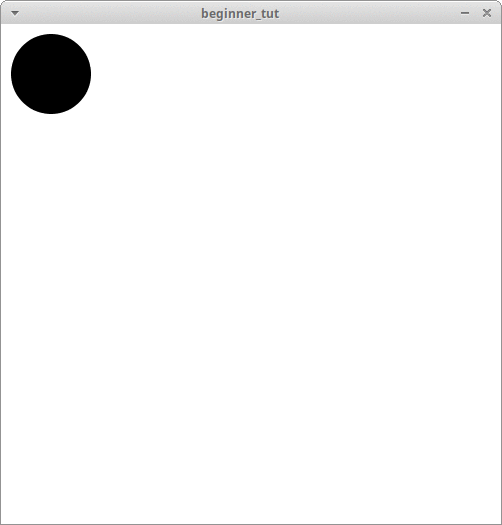
Once you're in Python mode, slap this code in your text editor and hit press the run/play button:
SIZE = 500

def setup():
  size(SIZE, SIZE)
  fill(0)
  noStroke()
  frameRate(0)
  draw()

def draw():
  clear()
  background(255)
  ellipse(50, 50, 80, 80)
You should see this:
Congratulations! You've got your canvas and paints! Now it's time to sweat and make art.
While following along it will be helpful to keep open the Python Processing reference, which has documentation for all of the functions we'll use or define.
Packing Circles
This is the basic algorithm we'll implement:
- Start with an empty list of circles.
- Generate a circle at a random point with a random size.
- Check to see if it overlaps with any circles we've already generated.
- If the circle doesn't overlap, add it to our list of circles.
- Return to step 2; loop until we've made
nattempts. - Draw all the circles in our list.
I'm going to define some classes for us to work with Points and Circles, expanding on them as
we go. You can write or paste these definitions above the setup() function.
class Point():
    def __init__(self, x, y):
        self.x = x
        self.y = y

class Circle():
    def __init__(self, radius, center):
        self.radius = radius
        self.center = center

    def render(self):
        ellipse(self.center.x,
                self.center.y,
                self.radius*2,
                self.radius*2)
Our draw function can now look like this:
def draw():
  clear()
  background(255)
  circle = Circle(40, Point(50, 50))
  circle.render ()
Generating Random Circles
Let's add some constructors to our Point and Circle class to get random instances using
Processing's random function.
class Point():
    ...
    @staticmethod
    def random():
        x = random(0, SIZE)
        y = random(0, SIZE)
        return Point(x, y)
class Circle():
    ...
    @staticmethod
    def random():
        radius = random(10, 50)
        return Circle(radius, Point.random())
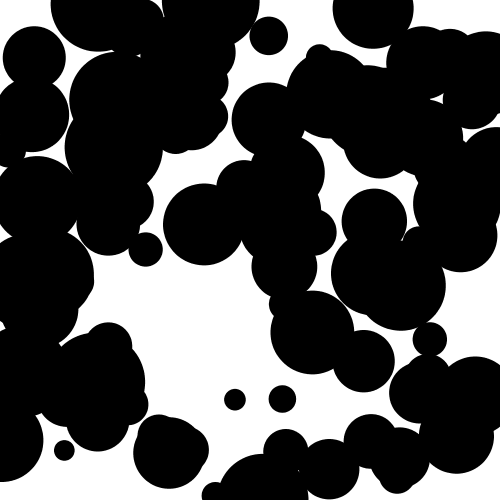
Now let's see it in action and just place a bunch of circles randomly by making this our draw function:
def draw():
  clear()
  background(255)
  for _ in range(0, 100):
      circle = Circle.random()
      circle.render()
It should look similar to this!
Testing Circles For Overlap
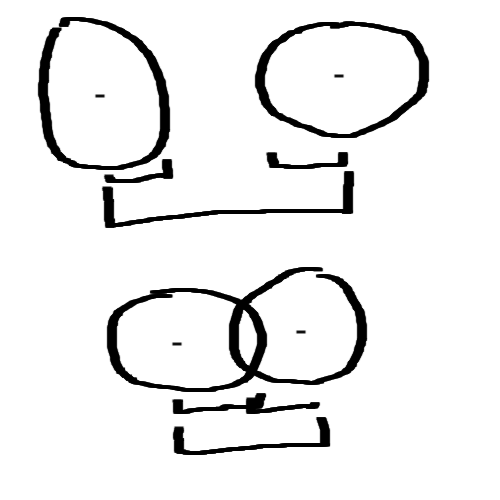
Circles are pretty easy to test for overlap. We just need to know if the centers of two circles are closer than the sum of their radii. Here's an MSPaint diagram I best-effort-ed to explain:
Let's add two methods to our classes to find the distance between points and the distance between the edges of two circles.
class Point():
    ...
    #https://en.wikipedia.org/wiki/Pythagorean_theorem
    @staticmethod
    def distance(point1, point2):
        xd = point1.x - point2.x
        yd = point1.y - point2.y
        return sqrt(xd ** 2 + yd ** 2)
class Circle():
    ...
    @staticmethod
    def distance(circle1, circle2):
        d = Point.distance(circle1.center,
                           circle2.center)
        return d - (circle1.radius + circle2.radius)
Now checking circles for overlap is simple as testing whether the distance is < 0.
Algorithm
Now that we can generate random circles and test them for overlap with one another, we're ready to implement our algorithm we outlined earlier.
# Packs Circles
#  attempts: How many circles we'll generate and
#            try to place.
def pack_circles(attempts):
    circles = []
    for i in range(0,attempts):
        # Create a candidate circle at a random point.
        circle = Circle.random()
        # Consider it valid if it doesn't collide with
        # any existing circles.
        collides = False
        for c in circles:
            if Circle.distance(c, circle) < 0:
                collides = True
                break
        if not collides:
            circles.append(circle)
    return circles
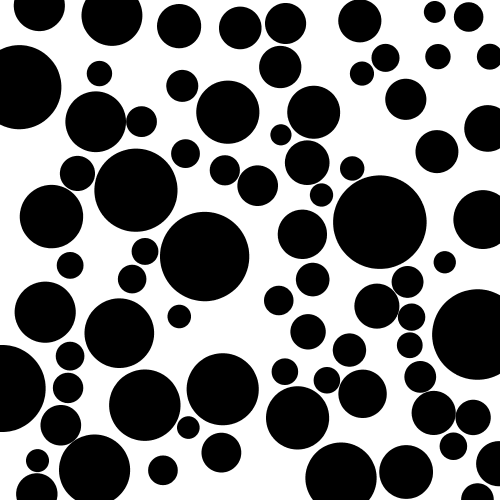
Then we can call it from our draw() function:
def draw():
  clear()
  background(255)
  circles = pack_circles(1000)
  for circle in circles:
      circle.render()
Your output should look something like this!
Congratulations! You have the start of something interesting! Now it's up to you to explore. Some suggestions:
- Try adding color to your circles.
- Checkout Manohar Vanga's procedural coloring tutorials.
- Try using noise to determine the size of the circles you generate.
- Try adding a margin between circles proporional to their size.
Doing it Faster
What we've implemented is an N^2 solution to our problem since we need to compare every circle
to every other circle. There is an Nlog(N) solution I cover in my post Packing Circles With
QuadTrees if you would like to try it.